One of the most common questions we receive from new radar detector owners is where to mount the device. Choosing the right mounting location is an important step when setting up your unit. Proper placement will help maximize performance, maintain a clean installation, and can even help reduce false alerts.
Because the ideal location can depend on your vehicle, this guide covers the most important factors to consider when choosing the best placement for your detector.
TABLE OF CONTENTS
Standard vs Premium Mount
All our radar detectors include both a basic Double Suction Cup Mount and a Premium Suction Cup Mount.
If you're still deciding on the best placement for your unit, we recommend testing mounting locations with the double suction cup mount before installing the premium mount.
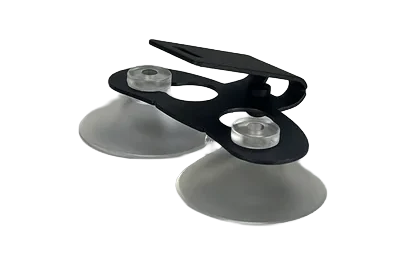
The Double Suction Cup Mount includes two standard suction cups and a metal mounting bracket.
When first unboxing the unit, the metal mounting plate will be completely folded. Gently unfold the bracket until it reaches the desired angle, then insert the suction cups into the slots. Press the cups firmly onto the windshield before sliding the unit onto the bracket.
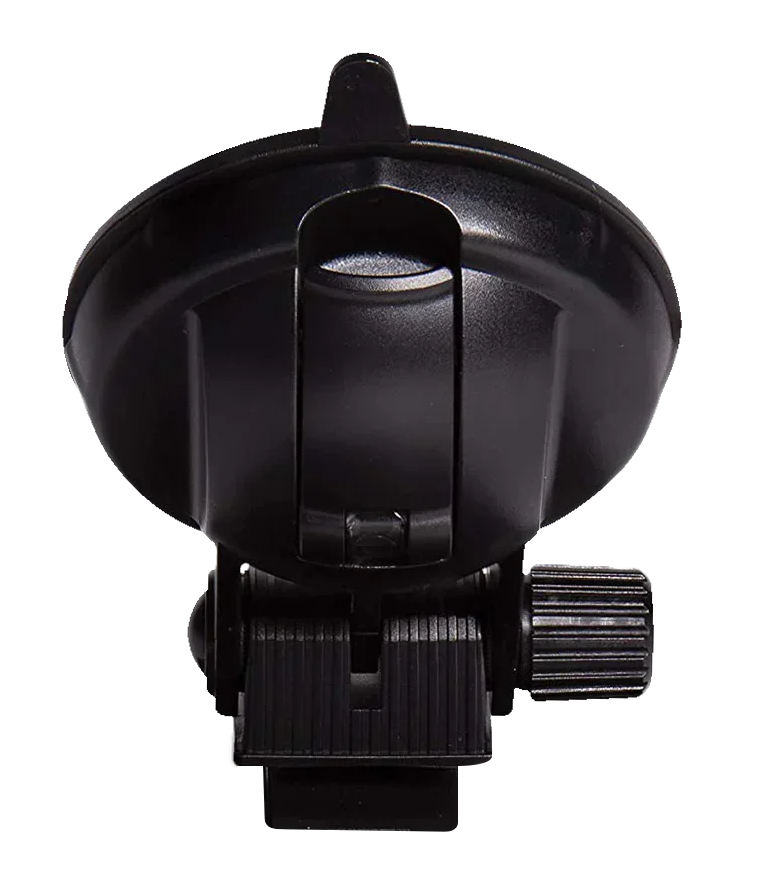 The Premium Mount features a giant, large suction cup with adhesive and a suction latch. Before attempting to mount the Premium Mount, we recommend wiping that area of your windshield with a soft, lint free cloth dampened with 80% (or higher) Isopropyl Alcohol. Allow the area to dry completely. Remove the clear plastic from the mount and release the latch before pushing the cup firmly into the windshield. Finally, lock in the suction by engaging the latch. Allow the mount to rest for a few minutes before sliding the unit onto the bracket.
Please note that there are two different versions of the Premium Mount, a Legacy Version (for the R1, R3, and DFR models) and a Modern version (R4, R4W, R7, R8, and R8w). The Legacy Version features a slightly different design, as seen here.
Should you ever need additional mounts or replacements, these can be purchased from Uniden.com. All parts included in the box with your new unit are covered by a one year limited warranty. See your owner's manual for more information regarding the warranty.
Power Options
All our radar detectors come with a standard 12V DC power cable with a RJ11 connector, that plugs into your vehicle's 12V accessory outlet. This power cable features a USB port for charging mobile devices, and a Mute button which can be used to mute alerts, create or delete a Mute Location, or change the display brightness.
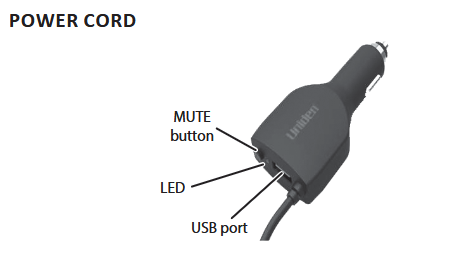
If your vehicle doesn't have a 12V accessory outlet, additional power options are available, including the USB-C to RJ11 Power Cord, as well as a Hardwire Kit (with mute button). These do not come with the unit and must be purchased separately.
Important: The USB port on your unit is only designed for updating the device and should not be used to power the device.
Dash Mounting
Included with your unit is hook and loop fastener tape for optional dashboard mounting.
When mounting on the dashboard, ensure the unit has a clear and unobstructed view from both the front and rear of the vehicle. Avoid mounting behind vents or near heavy A-pillars, and don't cover the device's air vent holes with the adhesive tape.
Some newer vehicles have safety and convenience features that use sensors that operate on the same bands as law enforcement technology and can cause your unit to alert. While the best placement depends on your vehicle, mount it away from obvious sensors and test before adhering your unit to the vehicle. If you experience a constant low level alert on the K or Ka band, move the unit 6 inches to the left or right and re-test.
Tips and Best Practices for Mounting
- Start With A Clean Surface. Use a soft, lint free cloth dampened with 80% (or higher) Isopropyl Alcohol to clean the mounting area and remove any residue or cleaning products. Let it completely dry before installing the mount.
- Ensure a clear and unobstructed view. While the exact placement depends on your vehicle, the optimum position is generally a the highest spot in the center of your windshield near the rearview mirror, with your unit level to the ground. For optimum performance, ensure the view is unobstructed from both the front and rear of the device.
- Plan Your Power. Before choosing a mounting location, consider your power cable. Make sure the cable can reach the power source and the RJ11 port of your unit without strain on the connector. Route the cable so that it doesn't interfere with your driving. Always keep it away from pedals and airbags.
- Test the Spot. If you're unsure about the best mounting location, use the Double Suction Cup Mount to test different positions before installing the premium mount.
- Don't refuse the fuse. When using the Hardwire Kit, never remove the fuse from the cable. If using an aftermarket power cable, make sure an appropriate fuse is installed between the power source and the unit.
- Mind the Vents. If you're considering mounting on the vehicle's dash, be sure not to cover air vent holes with the adhesive tape. When possible, avoid covering the serial number or keep it for your records, as this information may be needed for warranty or service purposes.
- Keep it Legal. Some states prohibit the use of radar detectors or restrict windshield-mounted devices. Be sure to check local laws before mounting.
- Know your windshield. Some newer vehicle models and/or trims include specialized windshield glass that contains metals in the coatings or within the layers of glass which are invisible to the naked eye. These metals can affect radar detector performance. Check your vehicle's user manual and use designated areas intended for toll tags, gate openers, or other devices that rely on RF signals. Similarly, aftermarket tinting can also impact functionality. If you have any questions, don't hesitate to contact our Customer Support Team, they're happy to help!
Frequently Asked Questions
Does mounting height and angle affect radar detector range?
Yes, both the mounting height and angle of the device can impact your detection range. In general, mounting your device higher and keeping it level and pointed straight ahead can help provide a clearer line of sight over longer ranges, particularly when hills, traffic, and other obstacles are present.
Keep in mind that windshields curve more toward the edges. Mounting too far to one side may cause the detector to angle away from the direction of travel, even if it appears level from inside the vehicle.
However, mounting height and angle are only two factors that can affect detection. Terrain, surrounding buildings and vehicles, environmental conditions, and the radar source can all influence detection.Does mounting height affect laser detection?
Yes, unlike radar, LiDar (laser) guns emit extremely narrow, focused beams with very little scatter. This means that radar detectors with LiDar detection abilities need to be close to or within the path of the laser beam to detect it. Because law enforcement commonly aims at highly reflective areas lower on the vehicle, such as around the grille, headlights, or license plate, mounting your unit lower on the windshield may improve its ability to alert to LiDar.
However, laser detection can vary significantly depending on the distance and angle of the laser source, where the beam is aimed, and other conditions. Keep in mind that a lower mounting placement can impact the range of radar detection. When choosing a mounting location, consider the types of law enforcement technology commonly used in your area and the balance between radar and laser detection that works best for you.Why won't my premium mount stay in place?
We have found that some windshield cleaners contain chemicals that can break down the adhesive on the Premium Mount. We recommend wiping that area of your windshield with 80% (or higher) Isopropyl Alcohol to remove any residue or chemicals and let it dry before attempting to re-adhere the mount to the windshield.How can I tell if my windshield has a coating or tinting that is interfering with the detector?
Some newer vehicle models and trims now come with safety or convenience features that require metals in the coatings or within the layers of glass which can inhibit of the functionality of the unit. Since these coatings and layers are invisible to the naked eye, we recommend checking your vehicle's user manual information on the recommended area for toll tags, gate openers, or anything that requires RF signals.
If your vehicle's windows have aftermarket tinting, a number of these films contain metals which can also block signals. Even a slight tinting can have a significant impact on the performance of your radar detector.
To test whether your windshield may be causing interference:
1.) Drive to a location where you know the unit will alert, such as a retail store or gas station with automatic doors, as the sensors often operate on the K band.
2.) When passing in front of the store, carefully hold the unit just outside the driver's window and observe the signal direction arrows.
3.) If the detector begins alerting from the front, this confirms that your windshield is impacting the device's ability to receive those signals from inside the cabin.
If you have any questions or need further assistance, don't hesitate to contact our Customer Support Team, they're happy to help!Can my vehicle itself cause false alerts depending on where the detector is mounted?
Some newer vehicles have safety and convenience features that use sensors that operate on the same bands as law enforcement technology and can cause your unit to alert. This is extremely common for newer Chevy and Honda vehicles. If you experience a constant weak alert on the K or Ka band, move the unit 6 inches to the left or right to see if this resolves the issue. If not, read our article on how to fix constant K band alerts and Ka band alerts.I want to reuse my Premium Mount? Is it possible?
We have found that when the mount detaches from the windshield, the adhesive itself is often exposed to dust and dirt that can inhibit the mount remaining in place after it's been put back on the windshield. If you see this happen, clean both the suction cup itself and the windshield with a soft cloth dampened with the 90% Isopropyl Alcohol Solution and try to mount it again once both have completely dried. The alcohol will remove the rest of the adhesive, but the powerful latch for the suction cup should allow it to hold onto the window.
Otherwise, replacement are available for purchase from Uniden.comCan I mount my unit behind the Frit, the black dotted area around my rear view mirror?
While the frit generally doesn't interfere with detection, this area may contain a coating or components that could interfere with signal detection or GPS reception.
Vehicles equipped with metallic coatings or metallic layers within windshields will often have a designated cut out area to accommodate devices that use radio frequencies. Depending on the vehicle, this area may be located within the frit. Before using this area to mount your radar detector, we recommend checking your user manual.
Additionally, the textured surface of this area may prevent suction cups from forming a secure seal. When mounting in this area, an alternative or specialized mounting method may be required.
For any other questions about Radar Detector placement and setup,
be sure to reach out to our Customer Service team!
You can reach us online here
or
Give us a call at 1-800-297-1023, Monday-Friday 8AM-5PM (CST)
Was this article helpful?
That’s Great!
Thank you for your feedback
Sorry! We couldn't be helpful
Thank you for your feedback
Feedback sent
We appreciate your effort and will try to fix the article